

Best Ways to Brew Artisan Coffee at Home in 2026
Table of Contents
- Why Your Brewing Method Changes Everything
- The 4 Best Ways to Brew Artisan Coffee at Home
- Coffee Brewing Ratios for Beginners: The Golden Ratio
- How to Tell if Coffee Beans are Fresh (Before You Brew)
- The Best Coffee Grind Size for Pour Over vs. Other Methods
- Water Quality and Temperature: The Hidden Variables
- Common Mistakes That Ruin a Cup of Artisan Coffee
- Conclusion: Your Next Steps to a Better Brew
- Frequently Asked Questions
Last Updated: September 7, 2026
Why Your Brewing Method Changes Everything
The best ways to brew artisan coffee at home start with one realization: the method you choose shapes more than just flavor. It determines body, acidity, and clarity, and it dictates which beans you should buy.
Most home brewers never taste their beans' full potential because the equipment works against them. Extraction needs the right balance of time, temperature, and agitation; get it wrong, and even a perfectly roasted single-origin lot tastes flat or bitter.
At Mocha Me Crazy, we roast every order on demand, so beans arrive at peak freshness. Fresher beans offer more margin for error, while older coffee exposes every flaw in your technique.
Below, we'll show you how to match a brewing method to your taste, plus the ratios, grind sizes, and water standards that separate a good cup from a memorable one.
The 4 Best Ways to Brew Artisan Coffee at Home
The four most effective ways to brew artisan coffee at home are pour-over, French press, AeroPress, and Moka pot. Each excels at a different flavor profile: pour-over rewards patience with clarity; the French press offers body; the AeroPress provides speed; and the Moka pot delivers bold strength.
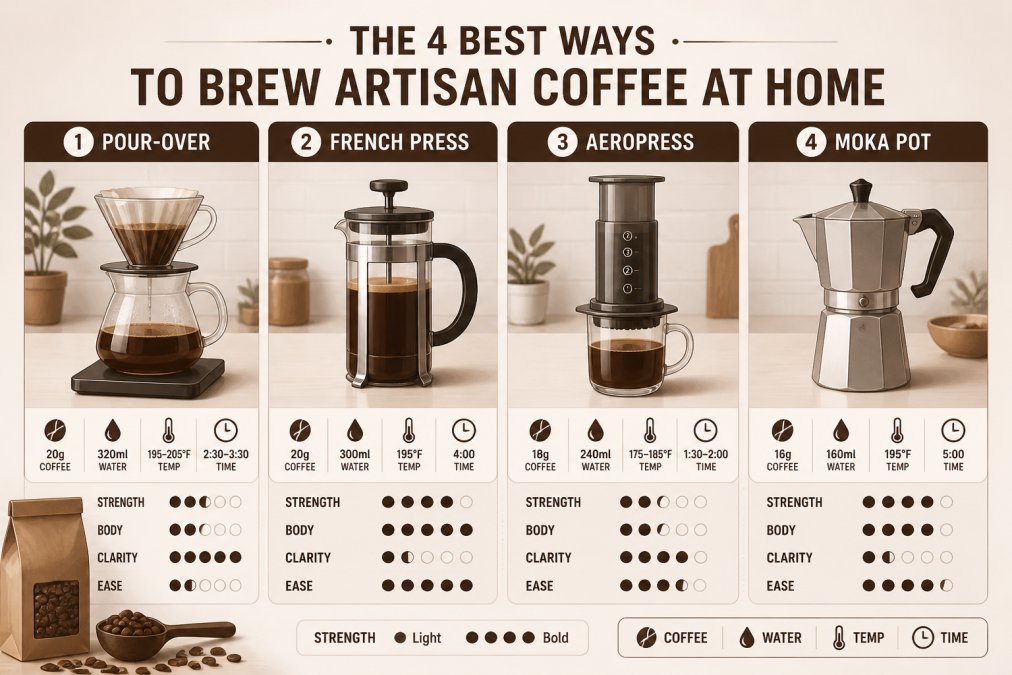
Here is a breakdown by entry cost and skill ceiling, so you can match the brewer to your goals without overspending on gear you will not use.
Pour-Over: Clarity and Complexity
Pour-over is the best choice for drinkers who want to taste a single-origin coffee's distinct character. The paper filter removes oils and fine particles, producing a clean, tea-like body with bright acidity and pronounced floral or fruity notes.
Budget tier: Start with a plastic V60 dripper for around $10 and a standard kettle, though a gooseneck kettle (entry models near $40) makes the technique easier. The skill ceiling is high.
The trade-off: Pour-over is the least forgiving method here. Grind inconsistency, an unsteady hand, or water that is too hot will produce a bitter or sour cup.
French Press: Full-Immersion Body
French press brewing uses a metal mesh instead of paper, so natural oils stay in the cup, creating a heavier body with a rich mouthfeel. The immersion process steeps coarse grounds for about four minutes.
Budget tier: A quality 34-ounce French press costs $25 to $50. No additional kettle is required, though a scale helps. This is the lowest-cost entry point to genuinely good coffee.
The trade-off: The metal mesh lets fine particles through, creating sediment. For a cleaner cup, pour the brewed coffee through a paper filter, but that removes the oils that give French press its signature body.
AeroPress: Speed and Versatility
The AeroPress is the most forgiving method for beginners and the most flexible for experimenters. It uses air pressure to push water through a fine filter, producing a smooth, concentrated cup in under two minutes.
Budget tier: The AeroPress costs around $40 and includes everything except a kettle and filters. Replacement paper filters are inexpensive; reusable metal filters cost around $15.
The trade-off: The AeroPress produces a smaller volume per batch, typically 8 to 10 ounces. Brewing for two or more people means brewing sequentially, which adds time.
Moka Pot: Bold Stovetop Espresso
The Moka pot brews strong, espresso-like coffee using steam pressure. It sits on the stovetop and forces hot water up through medium-fine grounds, producing a bold, full-bodied cup with caramelized sweetness.
Budget tier: A stainless steel 3-cup Moka pot runs $30 to $60. Aluminum versions cost less but can impart a metallic taste. No paper filters are needed, so ongoing cost is essentially zero.
The trade-off: Moka pot coffee is prone to bitterness if you let it boil or use too fine a grind. The brew is concentrated, so most drinkers dilute it with water or milk. Keep the burner low and remove the pot just as the brew finishes.
A quick comparison helps you decide which method fits your routine:
| Brewing Method | Brew Time | Body | Best For | Grind Size | Entry Cost | Skill Ceiling |
|---|---|---|---|---|---|---|
| Pour-Over | 3-4 min | Light, clean | Bright, fruity single origins | Medium-fine | $10-$50 | High |
| French Press | 4-5 min | Heavy, rich | Chocolatey, earthy blends | Coarse | $25-$50 | Low |
| AeroPress | 1-2 min | Smooth, versatile | Quick, customizable cups | Fine to medium | $40-$55 | Medium |
| Moka Pot | 5-6 min | Bold, syrupy | Espresso-style drinks | Medium-fine | $30-$60 | Medium |
Coffee Brewing Ratios for Beginners: The Golden Ratio
Coffee brewing ratios for beginners often sound intimidating, but the golden ratio is simple: 1 part coffee to 16 parts water by weight, or 30 grams of coffee for 480 grams of water, roughly a standard 16-ounce mug. A digital scale is the single best investment you can make.
Adjust the ratio to taste. A 1:15 ratio produces a stronger, more concentrated brew, while 1:17 yields a lighter cup that highlights acidity. Try the Specialty Coffee Association's brewing guidelines as a starting point, then experiment in small increments.
How to Tell if Coffee Beans are Fresh (Before You Brew)
To tell if coffee beans are fresh, check the roast date first. Whole beans peak between four and fourteen days after roasting. A bag without a roast date may have sat in a warehouse for months.
Fresh beans should have a matte, oily surface with a strong, sweet aroma. Beans that smell flat or slightly sour have likely oxidized and will produce a dull, papery cup.
This is why roasting to order matters. At Mocha Me Crazy, we roast only after you place your order.
The Best Coffee Grind Size for Pour Over vs. Other Methods
The best coffee grind size for pour over is medium-fine, similar to granulated sugar or sea salt, allowing water to extract flavors in the ideal three-to-four-minute window. Too fine, and the water stalls and over-extracts; too coarse, and the water rushes through, leaving a sour, weak cup.
Grind size directly controls extraction speed across every method, which is why a burr grinder matters. Blade grinders chop beans unevenly, creating a mix of fine dust and large chunks that brew at different rates. A guide to coffee grinding from the National Coffee Association explains that consistent particle size is the foundation of balanced flavor.
Match your grind to your brewer:
- Pour-over: Medium-fine, like kosher salt
- French press: Coarse, like breadcrumbs
- AeroPress: Fine, like table salt, but adjustable
- Moka pot: Medium-fine, slightly coarser than espresso
- Cold brew: Extra coarse, like cracked peppercorns
Water Quality and Temperature: The Hidden Variables
Water makes up over 98 percent of your cup, yet most home brewers ignore it. Tap water with high mineral content can dull flavors, while soft or distilled water under-extracts coffee, leaving it acidic and hollow.

Temperature is equally critical. The ideal slurry temperature is between 195 and 205 degrees Fahrenheit, just below boiling. Water that is too hot scalds the grounds; water that is too cool fails to extract sugars and acids, leaving the cup sour and weak.
Common Mistakes That Ruin a Cup of Artisan Coffee
The most common mistake is using stale, pre-ground coffee, which eliminates the possibility of a great brew before you start. The second is inconsistent grind size from a blade grinder. Both are easy to fix: buy whole beans with a visible roast date and invest in a burr grinder.
Another frequent error is skipping the bloom. When hot water first hits fresh coffee, carbon dioxide escapes rapidly. Pouring a small amount of water and waiting 30 seconds allows this gas to release, preventing uneven extraction. This matters most with pour-over and AeroPress.
Finally, many brewers use the wrong coffee-to-water ratio. Adjust by taste, but make one change at a time. If the coffee tastes bitter, coarsen the grind; if sour, fine it up; if weak, add more coffee rather than brewing longer.
The Missing Skill: Tasting Your Way to a Better Brew
Most troubleshooting advice tells you what to change but not how to recognize the problem. The fix is a simple sensory evaluation routine that takes less than a minute.
Step 1: Slurp, do not sip. Slurping aerates the coffee and spreads it across your palate, making flavor and texture easier to identify.
Step 2: Identify the dominant sensation. Ask yourself: is this cup more bitter, more sour, or more flat than expected? That single distinction points to the root cause.
Step 3: Map the sensation to the fix.
- Bitterness, a dry, astringent feeling at the back of the tongue or the roof of the mouth, means over-extraction. The water pulled too many bitter compounds from the grounds. Fixes, in order of impact: coarsen the grind, lower the water temperature slightly, or shorten the brew time.
- Sourness, a sharp, tangy sensation on the sides of the tongue, often described as "bright" when pleasant, means under-extraction. The water did not pull enough sugars and acids from the grounds. Fixes: fine up the grind, raise the water temperature, or extend the brew time.
- Flatness or hollowness, a watery, empty taste with no distinct character, usually means the ratio is too weak. Fixes: add more coffee relative to water, or check that your water has adequate mineral content (see the water quality section above).
Step 4: Change one variable at a time. If you adjust grind size and water temperature simultaneously, you will not know which change worked. Make one adjustment, brew again, and taste.
Conclusion: Your Next Steps to a Better Brew
Start with fresh beans, a burr grinder, and a scale, and you will already outperform most home setups. Choose a brewing method that matches the flavor profile you enjoy, then dial in grind size and ratio through small, deliberate adjustments.
Sourcing beans with a visible roast date is the foundation of every other step. Mocha Me Crazy roasts each order on demand, so your coffee arrives days, not months, after roasting, with maximum aroma and flavor locked in. Research on coffee freshness and flavor stability confirms that volatile aroma compounds degrade rapidly after roasting, which makes the time between roast and brew the most important variable you control.
Browse our single-origin coffees and blends to find a profile that suits your brewing style, and get started with Mocha Me Crazy for coffee that tastes like it was made for your morning ritual.
Frequently Asked Questions
What is the most effective way to brew coffee at home?
The most effective method depends on your taste preferences. Pour-over brewing offers the most control over extraction, producing a clean, bright cup that highlights single-origin flavors. If you prefer a fuller body with more mouthfeel, a French press is a solid choice. For speed and consistency, an AeroPress is hard to beat. Start with fresh, roasted-to-order beans and a burr grinder; those two factors make a bigger difference than the brewer itself.
How does grind size affect the taste of artisan coffee?
Grind size directly controls the surface area exposed to water, which dictates the extraction rate. A grind that is too fine for your method leads to over-extraction, causing bitterness. A grind that is too coarse causes under-extraction, resulting in a sour, weak cup. For pour-over, aim for a medium-fine texture like table salt. French press requires a coarse grind, while AeroPress works well with a fine-to-medium grind. Consistent particle size from a burr grinder is critical.
How do I determine if my coffee beans are fresh enough for artisan brewing?
Fresh beans release carbon dioxide for days after roasting, which is key to proper extraction and bloom. Look for a roasted-on date, not a best-by date, and aim for beans roasted within the past 2 to 4 weeks. Fresh beans should have a pronounced, sweet aroma when you open the bag. After grinding, the grounds should bloom vigorously when hot water hits them. If there is no bloom or the beans smell flat, they are past their prime.
What is the 15-15-15 rule for coffee?
The 15-15-15 rule is a memory aid for pour-over brewing: use 15 grams of coffee per 250 milliliters of water, let the bloom sit for 15 seconds, and grind the beans to a consistency that takes about 15 seconds to grind in a hand grinder. This simple starting point helps beginners achieve a balanced cup. Adjust the ratio to taste, but this framework builds a solid foundation for consistent results.
What is the ideal coffee-to-water ratio for beginners?
The golden ratio for most brewing methods is 1:16, meaning 1 gram of coffee for every 16 grams (or milliliters) of water. For a standard 12-ounce cup, that translates to roughly 21 grams of coffee and 340 grams of water. Start here and adjust slightly to suit your palate. Use a digital scale for accuracy; volume measurements like tablespoons are too inconsistent for artisan coffee.
What water temperature should I use for brewing artisan coffee?
Aim for water between 195°F and 205°F. Boiling water at 212°F will scorch the grounds and produce bitter flavors. If you lack a temperature-controlled kettle, let water sit for 30 to 45 seconds after boiling to drop to the right range. Water quality matters too. Filtered water with moderate mineral content extracts flavors more effectively than distilled water, which can produce a flat-tasting cup.